Rusty brake rotors are one of those issues you notice the moment you look through a set of smart alloy wheels. Surface corrosion might look alarming, but it does not always mean the discs are unsafe or need replacing. Understanding how and why rust forms on rotors gives you far more control over braking performance, MOT outcomes and day‑to‑day safety. If you drive infrequently, store a vehicle outdoors or live in a humid or coastal area, you will see rotor corrosion much more quickly. With the right tools, safe working habits and a structured approach, you can clean rust off brake rotors efficiently and restore smooth, predictable stopping power.
Understanding brake rotor corrosion: surface rust vs structural damage
How cast iron brake discs corrode: oxidation, humidity and road salt chemistry
Most brake rotors are made from grey cast iron, which offers excellent friction characteristics but is naturally prone to oxidation. When bare iron is exposed to oxygen and moisture, iron atoms react to form iron oxide – the familiar reddish‑brown rust that appears surprisingly quickly. In UK conditions, light surface rust can form on parked rotors in as little as 12–24 hours after rain. Add winter road salt into the mix and you create an electrolyte solution that dramatically accelerates the corrosion process. Calcium chloride and sodium chloride in salt brine increase the conductivity of the thin water film on the disc, making electrons move faster and encouraging deeper rust.
Short journeys make this worse. Rotors never get fully hot, so they do not dry out properly and the thin oxide layer is not scrubbed away by the pads. Vehicles that sit unused for weeks or months can develop visible rust ridges and bands where the pad does not contact the disc. On ventilated rotors, the internal vanes act like moisture traps, holding damp air against bare metal. Over time, that can turn simple surface rust into more persistent corrosion that slightly changes rotor thickness and uniformity, especially around the outer edges and cooling holes on drilled discs.
Distinguishing light surface rust from pitting, scoring and heat‑checking
Before you start cleaning rust off brake rotors, it helps to distinguish harmless surface oxidation from real structural damage. Light surface rust looks like an even orange film across the braking surface. You can usually see the original machining marks under it, and it often disappears after a few firm stops. By contrast, pitting appears as small craters or cavities in the metal where rust has eaten into the rotor. These pits can trap debris and reduce the actual pad contact area, affecting consistent braking and sometimes causing a rough pedal feel.
Scoring is different again. It shows up as deep grooves running around the disc in the direction of rotation, often caused by worn pads running down to the backing plate or hard particles embedded in the friction material. Heat‑checking, which is more common on high‑performance cars, towing vehicles and track‑driven models, appears as a pattern of fine radial or cross‑hatched cracks. These micro‑cracks result from repeated thermal cycling and localised hot spots. Any sign of crack propagation from the braking face towards the edge of the rotor is a strong indicator that the disc should be replaced rather than cleaned or machined.
When rusty rotors are still safe to machine or reuse vs when to replace
From a safety perspective, the core questions are: how deep is the corrosion, and has it compromised rotor thickness or integrity? Light surface rust that wipes away with brake cleaner or vanishes after a few careful stops is generally harmless. Even moderate rust on the rotor face can sometimes be machined off using a brake lathe, as long as the final thickness stays above the manufacturer’s minimum stamped on the rotor hat. As a rule of thumb, if the deepest pits are less than around 0.5 mm and evenly distributed, machining can restore a smooth friction surface and consistent pad contact patch.
Replacement becomes the sensible option when corrosion has undercut cooling vanes, created heavy pitting around the outer edge or left large areas of flaking metal. If you can catch the lip of a pit with a fingernail or see corrosion lifting the metal in layers, the disc’s structural integrity is suspect. Any clear radial cracks, large heat‑checks or blue‑black burnt spots are further signs of thermal damage. In those cases, cleaning rust off brake rotors is only a cosmetic fix; the safe solution is new discs, ideally fitted in axle pairs to maintain balanced braking.
Typical rust patterns on ventilated, solid and drilled rotors (ATE, brembo, bosch)
Different rotor designs and brands tend to show distinct rust patterns over time. Ventilated rotors from brands such as ATE or Brembo often rust worst around the outer edge and within the cooling vanes, where moisture and road salt collect. Solid rear discs, commonly fitted on smaller hatchbacks and city cars, frequently develop a rust band on the inner face that pads never touch, especially if the vehicle is used gently and mainly on motorways. Drilled and slotted rotors, particularly high‑carbon designs from manufacturers like Bosch, are more resistant to uniform surface rust but may show corrosion creeping from drill holes or slots if the vehicle is stored outdoors.
Knowing these patterns helps you decide where to focus when cleaning brake rotors. For example, if you see heavy rust on the non‑contact areas of a ventilated rotor but a relatively clean pad track, the disc may still perform adequately. Conversely, if the pad contact band on a solid rotor is patchy or shows dark islands surrounded by rust, the braking surface is no longer uniform. In that situation, even if the disc meets thickness specifications, the driver may experience judder, noise and inconsistent friction, which often justifies machining or replacement instead of simple de‑rusting.
Pre‑inspection: safety precautions, tools and set‑up before cleaning rusty rotors
Wheel chocking, axle stands and safe lifting using a trolley jack
Before any work on brake discs, safe lifting practice matters more than any cleaning technique. Always park on level, solid ground, select first gear or `P`, and apply the handbrake. Wheel chocks should be placed on the opposite axle to the one being lifted, preventing any chance of the vehicle rolling. A quality trolley jack rated well above the vehicle’s kerb weight gives a stable lift, but the jack is never a support. Once raised, the car must sit on proper axle stands under approved jacking points or chassis members. Many home enthusiasts underestimate this step, yet injuries from vehicles slipping off jacks still account for dozens of emergency room visits each year in the UK.
Raising only one corner at a time when cleaning rust off brake rotors is perfectly acceptable, but always support that corner securely before removing a wheel. Give the car a firm rock on the stands to confirm stability. If you work on gravel or tarmac on a hot day, placing a steel or wooden plate under each axle stand foot spreads the load and stops sinking. Taking five extra minutes to set the vehicle up correctly prevents sudden movement when applying force with a breaker bar or when rotating the wheel by hand to check rotor condition.
Required hand tools: torque wrench, breaker bar and appropriate wheel nut sockets
Even a simple brake rotor rust cleaning job benefits from a basic but solid toolkit. A long breaker bar helps undo stubborn wheel nuts and caliper bracket bolts, especially where road salt has seized threads. Matching impact‑rated sockets to your wheel nut profile avoids rounding. Once the job is finished, a calibrated torque wrench lets you refit wheels and calipers to manufacturer torque specifications, which helps prevent warped rotors from uneven clamping forces. Many manufacturers quote wheel nut torque values in the 110–140 Nm range for typical passenger cars, but performance models and vans often require higher settings.
Additional useful tools include a flat‑blade screwdriver for removing retaining springs and caps, a wire brush for bolt heads and hub faces, and a bungee cord or hook to suspend the caliper without straining the brake hose. If you plan to use powered tools for rust removal, such as a drill‑mounted wire wheel, ensure the drill has variable speed control for gentle operation around the braking surface. Having all of this ready before you lift the vehicle makes the process of cleaning brake discs far smoother and reduces the temptation to cut corners later.
Personal protective equipment for brake dust and rust flakes (FFP2 mask, eye protection, gloves)
Brake dust and rust flakes may not look especially dangerous, but they can be harmful if inhaled or embedded in the eyes. An FFP2 or equivalent dust mask offers good protection against fine particulate matter released when brushing or abrading the rotor. Safety glasses or, ideally, wrap‑around eye protection prevent flakes and wire strands from wire brushes from reaching delicate eye tissue. Nitrile or mechanic’s gloves shield skin from sharp edges and from repeated contact with brake cleaner, which can be quite aggressive and drying.
Modern friction materials are largely copper‑reduced due to tightening environmental regulations, yet used pads still contain a mixture of metals, resins and fillers you do not want to breathe. Treat any dust generated while cleaning rust off brake rotors as potentially harmful. Wetting the surface slightly with brake cleaner before brushing can help reduce airborne particles. Keeping your face out of the direct line of debris from a spinning wire wheel further reduces risk. Thoughtful use of personal protective equipment adds a small cost but greatly reduces long‑term health exposure.
Protecting brake pads, calipers and hub assemblies during rotor rust removal
During rotor cleaning, it is easy to think only about the rust you want to remove and forget the components you need to protect. Brake pads should stay free from oil, lubricants and aggressive chemicals, or they can glaze, swell or delaminate. If the caliper remains in place, you can carefully mask exposed pad surfaces with aluminium foil or a folded rag while brushing nearby areas. Avoid spraying brake cleaner or iron fallout remover directly onto painted caliper bodies unless confirmed compatible with the coating.
The hub assembly and wheel bearing sit just behind the rotor and are packed with grease or sealed lubrication. Penetrating oils such as WD‑40 Specialist can migrate into these areas if used excessively, thinning grease and potentially leading to premature bearing wear. When cleaning rust off the rotor hat and hub mating surface, apply chemicals sparingly and use targeted brushes rather than indiscriminate spraying. A balanced approach keeps friction surfaces clean while maintaining the integrity and longevity of nearby moving parts.
Mechanical rust removal methods: from wire brushing to rotor skimming
Manual de‑rusting with wire brushes, Scotch‑Brite pads and abrasive blocks
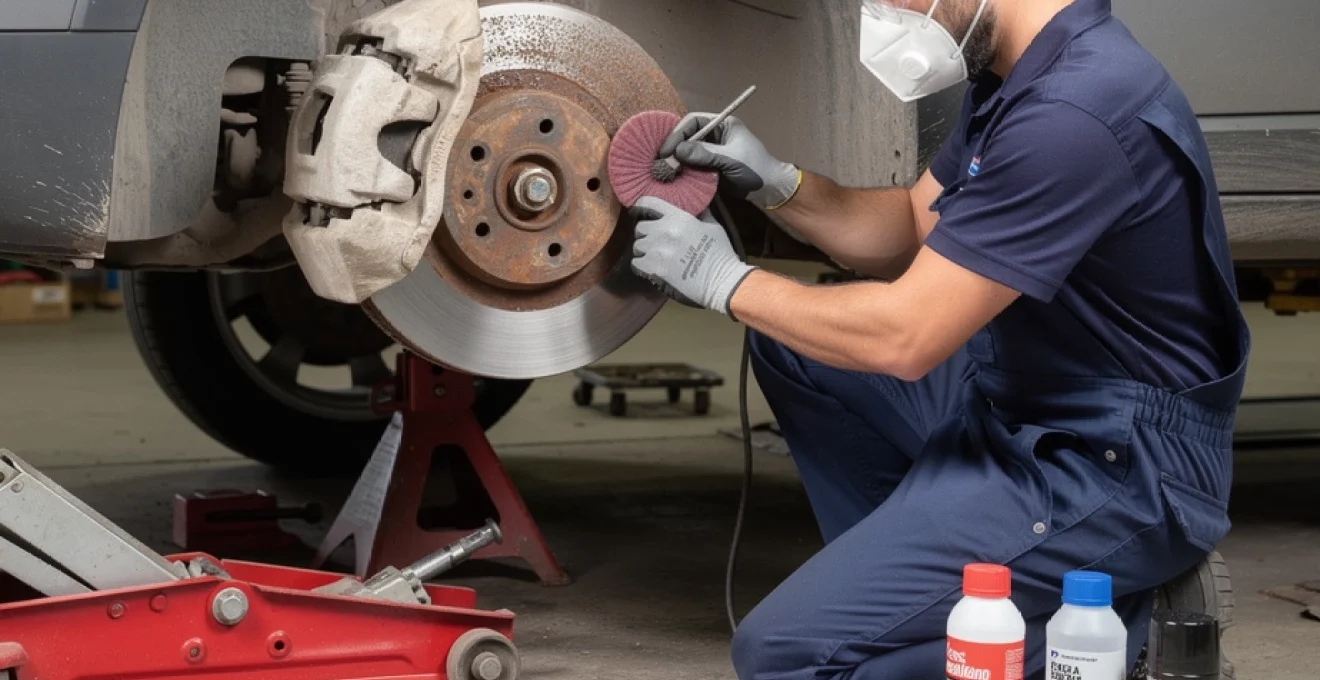
For light to moderate rotor corrosion, manual methods are often sufficient and give the most control. A stiff wire brush helps break up loose, flaky rust on the rotor hat, edges and non‑contact surfaces. For the braking face itself, finer tools such as Scotch‑Brite pads or dedicated abrasive blocks allow you to clean rust off brake rotors without gouging. Working in a circular motion, following the natural direction of rotor rotation, keeps the finish uniform and avoids creating flat spots or localised high spots.
Think of it a little like cleaning a record player disc: you want to follow the grooves rather than scratch across them. Using light to moderate pressure is usually enough to strip surface oxidation back to bright metal. If you see deep pitting emerge as you clean, that is a sign to reassess whether the disc remains suitable for service. Always avoid sanding pads themselves; contaminated friction material rarely recovers its original characteristics and is relatively inexpensive to replace compared with the safety risk of compromised braking.
Using drill‑mounted wire wheels and flap wheels without damaging the braking surface
Power‑assisted tools can speed up the process dramatically, particularly on heavily rusted rotor hats or stubborn deposits at the disc edge. Drill‑mounted wire wheels and flap wheels are effective, but they introduce a new risk: it is easy to remove more material than intended. When using these tools on the braking surface, select a fine or medium‑grade attachment and keep the drill speed moderate. Let the tool do the work rather than leaning heavily on it. Moving continuously around the rotor prevents local overheating or over‑machining.
If you are cleaning rust off brake rotors with a drill, maintain a shallow angle to the surface so the wheel or flap runs smoothly instead of digging in. Restrict more aggressive attachments to non‑friction areas such as the rotor hat, vents and mounting faces. Treat the braking face almost as a finished machined surface, similar to a cylinder head: the aim is to refresh, not reshape. After using powered tools, wipe the disc down with brake cleaner and an lint‑free cloth to remove metal dust and check the surface for any new marks or scratches.
Lathe machining and on‑car brake lathe resurfacing (Pro‑Cut, hunter) for heavily rusted discs
When surface rust has developed into more significant pitting or irregular wear, professional rotor machining becomes an option. Traditional off‑car brake lathes allow a technician to mount the disc and remove a controlled amount of material across the entire face, restoring parallelism and a clean contact band. On‑car systems from brands such as Pro‑Cut and Hunter go a step further by machining the rotor while it remains bolted to the hub. This compensates for minor hub run‑out and helps reduce brake judder and steering wheel vibration under braking.
Industry data suggests that correctly resurfaced discs can extend rotor life by 30–40% compared with immediate replacement, especially in fleets and high‑mileage vehicles. However, machining requires accurate measurement equipment and strict adherence to specifications. The lathe operator typically removes only 0.1–0.3 mm per side in a clean‑up cut, enough to clear rust and shallow grooves whilst preserving heat capacity. If two clean‑up passes are insufficient to remove damage, the disc is usually approaching its wear limit anyway, at which point replacement offers better long‑term reliability and safety.
Limitations of machining: minimum disc thickness, run‑out tolerances and heat dissipation
Every rotor carries a `MIN TH` figure cast or stamped into the rotor hat, indicating the minimum safe operating thickness. Machining beyond this limit reduces the mass of the disc and its ability to absorb and dissipate heat. Thinner rotors reach fade temperatures more quickly in heavy braking, which can extend stopping distances. For context, reducing rotor thickness by 10% can cut heat capacity by around 15–20%, a significant change during emergency stops or on alpine descents. That is why professional workshops measure disc thickness in several positions before and after machining.
Run‑out – the degree to which the disc wobbles side to side as it rotates – is another constraint. Most manufacturers specify a maximum lateral run‑out of around 0.05–0.1 mm at the rotor edge. Excessive run‑out after machining can lead to disc thickness variation (DTV) over time, causing steering vibration. When cleaning rust off brake rotors mechanically, keep these tolerances in mind. If corrosion or prior machining has left the rotor close to minimum thickness, further material removal is rarely justified. Instead, fitting new discs restores original heat dissipation and dimensioning, giving you a predictable baseline for future maintenance.
Chemical and hybrid cleaning techniques for brake rotor rust
Using ph‑neutral wheel and iron fallout removers (e.g. bilt hamber korrosol, auto finesse iron out)
Chemical decontamination products originally designed for alloy wheels can also help with mild rotor rust. pH‑neutral iron fallout removers such as Bilt Hamber Korrosol or Auto Finesse Iron Out use chelating agents that dissolve iron oxides without attacking surrounding paint or clearcoat. When applied to a rusty rotor face, they react with surface contamination, often turning purple as they work. For drivers who want to clean rust off brake rotors without aggressive abrasion, these products offer a gentle first pass, especially on recently developed corrosion after a period of storage.
The key is controlled use. Apply the fallout remover to the rotor face with the wheel removed, keeping spray away from pads and caliper seals where possible. Allow it to dwell for the manufacturer‑recommended time, usually 3–5 minutes, but do not let it dry. Light agitation with a soft brush or pad enhances performance. Rinse thoroughly with clean water afterwards to flush away dissolved rust and chemical residues. On its own, chemical cleaning rarely fixes heavy pitting, but it does make subsequent mechanical methods faster and more uniform by loosening bonded oxidation and brake dust.
Controlled use of rust converters and penetrants (kurust, WD‑40 specialist) on non‑friction areas
Rust converters, such as Kurust‑type phosphoric acid formulations, change active rust into a more stable, paintable compound. These products are excellent for rotor hats, edges and mounting flanges but must not be used on the braking surface itself. Converted rust leaves a dark, sometimes slightly glossy finish that is unsuitable for direct pad contact. Similarly, penetrants like WD‑40 Specialist are great for freeing off rusted retaining screws or hub faces but contaminate friction materials if oversprayed. Treat these products like targeted spot treatments rather than wide‑area cleaners.
When cleaning rust off brake rotors, a useful strategy is to mask the braking band with tape or card before applying converters to the hat. After conversion and drying, you can overcoat the area with a high‑temperature caliper or chassis paint, which offers longer‑term cosmetic protection against future rust. That approach is especially valuable in regions where winter road salt is used heavily or on vehicles stored outdoors for long periods. Just remember: any product that remains slightly oily, glossy or rubbery after curing does not belong on a friction surface.
Combining chemical decontamination with light abrasion for uniform rotor surfaces
The most effective way to clean rust off brake rotors often combines chemical and mechanical methods. Think of chemical cleaners as doing the “soaking” stage in a washing process, softening and loosening rust and metallic contamination. After the fallout remover has worked and been rinsed, light abrasion with a Scotch‑Brite pad or fine abrasive block brings the rotor face back to a uniform metallic sheen. This hybrid technique is particularly useful on cars that have been stored for a season, where surface rust is patchy rather than deeply ingrained.
Working in this way also reduces the amount of physical effort required and minimises the risk of accidentally removing too much material. By letting chemistry do the first pass, you can be gentler with hand tools, preserving the original machining pattern where possible. Many professional detailers and enthusiast forums now favour this combined approach, as it balances effectiveness with rotor longevity. It mirrors a broader trend in automotive care towards less invasive, more chemically sophisticated methods that maintain original components wherever safely possible.
Rinsing, drying and avoiding contamination of brake pads and friction linings
After any chemical treatment, thorough rinsing is crucial. Remaining cleaner on the disc can react with pad material the next time you brake, potentially glazing the surface or altering friction characteristics. Use plenty of clean water to flush the rotor face, grooves, drill holes and the area around pad edges. Allow the disc to air dry, or speed the process with compressed air, directing the flow away from caliper boots and seals. Before reassembling, a final wipe with dedicated brake cleaner ensures any residual film is removed.
Brake pads and friction linings deserve special attention. If you accidentally overspray chemicals onto the pad surface, it is safer to replace the pads rather than risk reduced friction or uneven bedding. Some professionals lightly scuff contaminated pads with fine abrasive paper, but in safety‑critical systems the conservative approach is preferable. Once the wheel is refitted and the vehicle is back on the ground, remember that the first few stops may feel slightly different as any micro‑film is burned off. Planning a controlled test drive after cleaning rust off brake rotors allows you to confirm consistent, predictable pedal feel.
Step‑by‑step process: cleaning rust off brake rotors on‑car vs off‑car
On‑car light rust removal after storage: short‑journey braking vs manual cleaning
For many drivers, the simplest way to clean surface rust off brake rotors is through normal use. After a few days of rain followed by a weekend on the driveway, you might notice a light orange film through the wheels. In that scenario, controlled braking over a short journey will usually restore a shiny metallic band where the pads contact the disc. Choose a quiet road, accelerate gently to around 30–40 mph and apply a series of medium stops, avoiding full emergency braking to prevent pad glazing. Within 5–10 stops, most light corrosion will have been scrubbed away.
However, if the vehicle has sat for months or the rotors show heavier rust patches, on‑car manual cleaning becomes more appropriate. With the wheel removed, you can keep the caliper and rotor in place while using a combination of brushes, pads and possibly fallout remover on the accessible surfaces. Rotating the hub by hand lets you work around the full circumference. This on‑car method saves time compared with disc removal and is often sufficient for everyday use where the corrosion is cosmetic rather than structural.
Removing the wheel, assessing pad contact patch and exposing the full rotor face
When more detailed inspection or thorough cleaning is needed, exposing the full rotor face is essential. After safely lifting and supporting the vehicle, remove the wheel and visually inspect the disc. Look for a clear, even pad contact patch – typically a band a few millimetres in from the outer edge, extending towards the centre. Any patchiness, dark spots or sections where rust remains within this band indicate uneven contact or sticking caliper components. While cleaning rust off brake rotors, take the opportunity to check pad thickness and wear pattern; uneven wear can point towards seized slider pins or sticky pistons.
If necessary, remove the caliper by undoing the guide pin or carrier bolts, then suspend it securely. This exposes the full rotor surface and edges, allowing you to clean both faces. Some vehicles also use a small retaining screw to hold the rotor to the hub; this may be rusted and require penetrating oil and a proper impact driver to avoid cam‑out. Once removed, you can take the rotor off entirely for bench‑mounted cleaning or measurement, which is particularly useful if you suspect disc thickness variation or run‑out issues contributing to brake judder.
Cleaning the rotor hat and hub mating surface to prevent lateral run‑out and wheel wobble
Often overlooked, the interface between the rotor and the hub is critical to smooth, wobble‑free braking. Corrosion or debris trapped between these faces can introduce lateral run‑out even on brand‑new discs. When the rotor is removed, carefully clean the hub face with a wire brush and, if needed, a gentle abrasive disc designed for hub preparation. The goal is a clean, flat, bare metal surface without raised rust islands. Apply the same care to the rear face of the rotor hat, ensuring old rust and scale are removed before refitting.
Some technicians apply a very thin smear of high‑temperature anti‑seize around the centre bore to ease future removal, but this must never migrate onto the braking surface or wheel stud threads. Once reassembled, checking run‑out with a dial gauge gives quantitative confirmation that the rotor runs true. Even without specialist tools, careful cleaning at this interface significantly reduces the likelihood of steering vibration, especially noticeable on light‑steering electric vehicles where brake judder is more obvious to the driver.
Gradual re‑bedding of brake pads (pagid, ferodo, EBC) after rotor rust removal
Any time the rotor surface is significantly altered – whether by aggressive rust removal, machining or replacement – the existing pads need to bed into the new surface. Bedding‑in, or burnishing, establishes a consistent transfer layer of pad material on the disc and optimises friction. Performance pad manufacturers such as Pagid, Ferodo and EBC publish specific bedding procedures, but a common method involves a series of medium‑pressure stops from moderate speeds without coming to a complete halt. This prevents hot spots where pads clamp a stationary disc and reduces the risk of imprinting that later feels like warped rotors.
Plan a controlled bedding‑in drive once the brakes have cooled from any workshop activity. For example, perform 8–10 stops from 30–40 mph down to around 10 mph with moderate pedal pressure, allowing partial cooling between each. Follow this with a few lighter stops to smooth the transfer layer. During this process, you may notice a slight change in pedal feel or a faint odour as resins in the pad material cure further. After bedding, the system should deliver consistent, predictable braking, confirming that your work cleaning rust off brake rotors has integrated properly with the pad material.
Preventing future rust: protective coatings, driving habits and storage strategies
Once brake rotors are clean and functioning correctly, attention naturally turns to preventing rust from returning too quickly. Some modern discs come with anti‑corrosion coatings on the rotor hat and non‑friction areas, using zinc flake or high‑temperature paints that significantly delay rust in UK winters. For uncoated rotors, carefully applied high‑temp paint on the hat and edges after cleaning offers a similar benefit. Avoid coating the friction band; instead, let normal pad contact keep this area polished. In damp climates, statistics from fleet operators show that vehicles driven at least twice a week suffer noticeably less rotor corrosion than those left idle for long stretches, even if annual mileage is similar.
Your driving habits also play a part. Very light braking, especially in hybrid and electric vehicles that rely heavily on regenerative braking, can leave the friction brakes underused. Many EV manufacturers now recommend occasional “maintenance braking” – deliberate use of friction brakes to keep discs clean and prevent caliper seizure. Adopting a routine where you perform a few firmer stops each week helps maintain clean, rust‑free contact bands. For long‑term storage, choosing a dry, ventilated garage, avoiding damp grass or earth under the car, and occasionally rolling the vehicle so pads do not sit in the same spot on the rotor can all slow corrosion.
Think of brake rotors as a consumable safety component affected by environment, chemistry and usage. By understanding how corrosion starts, choosing appropriate methods to clean rust off brake rotors, and adjusting storage and driving patterns, you dramatically extend rotor life while preserving smooth, confident braking for every journey.